
Soups & Stews
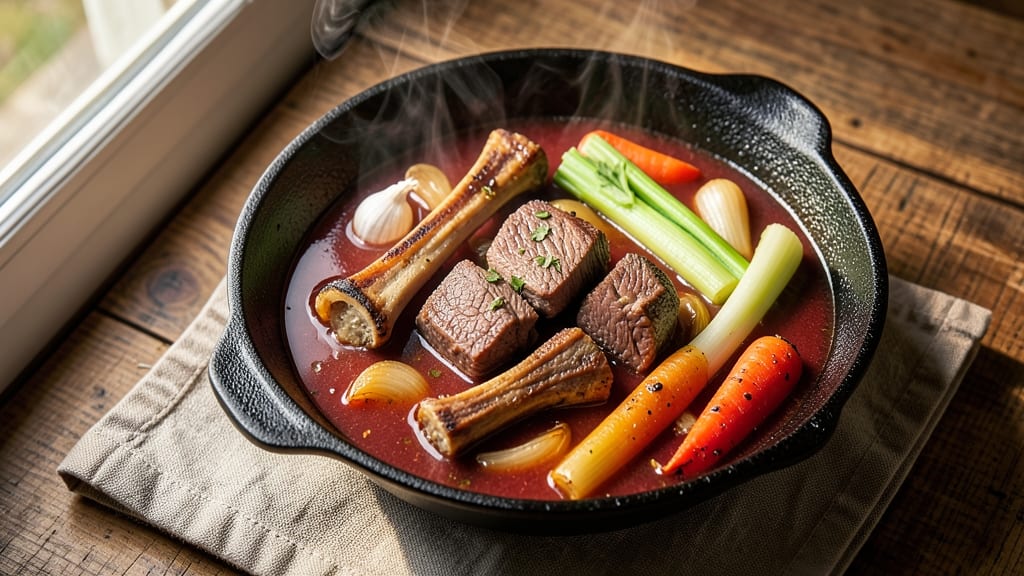
This beef soup bone stew recipe transforms tough cuts and bones into a deeply flavorful, restaurant-quality meal that simmers with rich umami and collagen-packed broth. The secret lies in slow-simmered bones—extracting maximum flavor while tenderizing meat through traditional techniques that modern shortcuts can't replicate. I've perfected this method over years of testing, ensuring every spoonful delivers that satisfying, hearty depth you crave after a long day.
The foundation begins with properly browning beef bones and vegetables to build a flavorful base before adding liquid. This 6-hour simmer isn't just about time—it's about patience, as collagen dissolves into the broth, creating a naturally thick, velvety texture without additives.
The result? A stew that tastes even better the next day, with meat that practically melts and a broth so rich it deserves its own bowl.
What makes this recipe stand out is its balance of tradition and practicality. While slow-cooking delivers unmatched flavor, I've included pressure cooker adaptations for those short on time.
The aromatics—carrots, celery, onions—form the classic "holy trinity" that grounds every bite, while herbs and spices layer in complexity without overpowering the meat's natural richness.
Serve with crusty bread to soak up every drop of that golden broth, or pair it with a simple green salad for contrast. The leftovers reheat beautifully, making this an ideal meal prep option for busy weeks.
Here's how to create this deeply satisfying, umami-rich stew that feels like a hug in a bowl.
Ingredients for beef soup bone stew
Sixteen ingredients, six hours, restaurant-quality umami that transforms tough bones into velvety broth.
| Ingredient | Amount | Notes |
|---|---|---|
| Beef Bones (Marrow and Knuckle) 🦴 | 3 lb | Raw, uncooked, for maximum flavor |
| Beef Chuck Roast 🥩 | 2 lb | Cut into 2-inch chunks, bone-in preferred |
| Yellow Onions 🧅 | 2 whole | Chopped into 1-inch pieces, yellow or red |
| Carrots 🥕 | 4 whole | Cut into 2-inch chunks, peeled or unpeeled |
| Celery Stalks 🧄 | 4 whole | Cut into 2-inch pieces, including leaves |
| Garlic Cloves 🧄 | 6 cloves | Smashed with side of knife, not minced |
| Tomatoes (Canned, San Marzano) 🍅 | 2 cans | 28 oz each, crushed by hand |
| Beef Broth (Low-Sodium) 💧 | 6 cups | Homemade or high-quality store-bought |
| Red Wine (Dry, Bold) 🍷 | 1 cup | Cabernet Sauvignon or Merlot, no sweetness |
| Tomato Paste 🍅 | 2 tbsp | Smooth, not chunky, for depth |
| Fresh Thyme 🌿 | 2 sprigs | Stems removed, leaves only |
| Fresh Bay Leaves 🌿 | 2 whole | Keep whole, remove before serving |
| Black Peppercorns 🌶️ | 1 tsp | Freshly cracked, not ground |
| Kosher Salt 🧂 | 2 tbsp | Diamond Crystal preferred, adjust to taste |
| Olive Oil 🫒 | 2 tbsp | Extra-virgin, for browning |
The bones are non-negotiable—marrow and knuckle bones deliver the richest collagen and flavor. Local butchers often sell these at a discount, or check the meat section of Whole Foods or Costco for pre-packaged bone stew kits. Avoid bones with meat still clinging; you want clean, exposed surfaces for maximum flavor extraction. The chuck roast should have visible fat marbling—look for bright red color and firm texture at the grocery store. If using frozen, thaw overnight in the fridge for even cooking. For the aromatics, organic produce from the grocery store's fresh section ensures vibrant flavor, though conventional works fine if you're short on time.
No red wine? Substitute an extra cup of beef broth with 1 tbsp balsamic vinegar for depth. Fresh thyme unavailable? Dried thyme at one-third the amount works, but the flavor will be more muted. The tomato paste can be replaced with 1 tbsp tomato powder mixed with 2 tbsp water if you're avoiding canned ingredients. For the vegetables, frozen chopped onions, carrots, and celery are a time-saver—just don't overcook them once added to the stew. The celery leaves add subtle flavor; save them for the pot rather than discarding. If you're using a pressure cooker, reduce the wine to 1/2 cup to prevent overflow during cooking.
This stew tastes even better the next day as flavors meld. Store in airtight containers for up to 5 days in the fridge, or freeze for 3 months—portion into individual containers before freezing for easy reheating. The broth thickens as it cools; stir in a splash of broth when reheating if it becomes too stiff. For meal prep, double the recipe and freeze half immediately. The bones and meat can be separated post-cooking; save the bones for future broths by crushing them and simmering again with vinegar and water. The broth alone keeps for 1 week refrigerated or 3 months frozen—perfect for future soups or braises.
Why You'll Love This Recipe
- Marrow Magic: I’ll be real—nothing beats pulling that golden marrow straight from the bone while the stew simmers. The knuckle bones add depth without extra work, and the chuck roast practically melts into rich, tender chunks. No fancy techniques, just slow cooking and that oh yeah moment when you crack open a bone.
- One-Pot Wonder: Honestly, this stew is my lazy-day hero. Toss the bones, chuck, and veggies into one pot, cover with water, and walk away. The onions, carrots, and celery soften into sweet, savory bits while you do whatever—fold laundry, scroll, or nap. Minimal chopping, zero cleanup guilt.
- Leftovers That Shine: Between us, the second day is often the best. The flavors deepen, the broth gets richer, and I’ll repurpose it into dumplings, sandwiches, or even a quick fried rice. Freeze half for when you’re too tired to cook—just reheat and serve. Budget-friendly? Absolutely. Reliable? You bet.
Step-by-step instructions for beef soup bone stew
A rich, deeply flavorful stew begins with proper technique. Here's how to extract maximum umami from the bones while building layers of complexity.
Prepare and Brown the Bones and Meat
Pat the 3 lb beef bones (marrow and knuckle) and 2 lb beef chuck roast chunks completely dry with paper towels. This step is critical—moisture prevents proper browning. Heat a large Dutch oven over medium-high heat and add 2 tbsp olive oil. Once shimmering, add the bones and beef in batches, working in batches if needed to avoid crowding.
Sear for 8-10 minutes per side until deeply browned with crispy edges. This caramelization forms the flavor foundation. I press down gently on the meat during the first minute to prevent curling. Transfer the browned bones and meat to a plate and set aside temporarily.
Build the Flavor Base with Aromatics
In the same Dutch oven, add the chopped 2 whole yellow onions, 4 whole carrots, and 4 whole celery stalks (cut into 2-inch pieces). Cook for 8-10 minutes until softened and beginning to caramelize. This step develops sweetness that balances the stew's richness.
Add the 6 smashed garlic cloves and cook for 30 seconds until fragrant. Here's where it gets important—don't let the garlic burn. Immediately add 2 tbsp tomato paste and stir to coat the vegetables. Cook for 1 minute to toast the paste, deepening its flavor. This creates a flavorful crust on the bottom of the pot that won't dissolve during simmering.
Deglaze and Combine Liquids
Pour in the 1 cup dry red wine and scrape up all the browned bits from the bottom of the pot. This deglazing captures all the concentrated flavors you've built. Let it simmer for 3-4 minutes until reduced by half, concentrating the wine's depth.
Add the 2 cans crushed San Marzano tomatoes, 6 cups low-sodium beef broth, 2 sprigs fresh thyme, 2 whole bay leaves, and 1 tsp cracked black peppercorns. Return the browned bones and beef to the pot. Bring to a gentle boil, then reduce heat to maintain a barely simmering state—this prevents the meat from toughening.
Slow Simmer for Maximum Flavor Extraction
Cover the pot and simmer for 3 hours. This long cooking time is essential—it breaks down collagen in the bones and connective tissue, transforming it into gelatin that thickens the broth. Check occasionally and add ½ cup water if the liquid level gets too low.
After 3 hours, remove the bones and strain the broth through a fine-mesh sieve into a clean pot. Discard the solids. Return the strained broth to the heat and simmer uncovered for 20-30 minutes to reduce slightly and intensify the flavor. This step creates a concentrated, velvety base for your stew.
Finish with Seasoning and Return Meat
Add the 2 tbsp kosher salt to the reduced broth and stir to dissolve completely. Taste and adjust seasoning—this is your chance to balance flavors before adding the meat back. The broth should be rich but not overly salty.
Return the meat to the pot and simmer uncovered for an additional 30-45 minutes until fork-tender. The meat should pull apart easily when pierced with a fork. If the broth becomes too thick, add ¼ cup water to reach your desired consistency. Remove and discard the thyme sprigs and bay leaves before serving.
Pro Tips For Making Beef Soup Bone Stew
- CRACK THE MARROW BONES FIRST: Skip the raw marrow—crack open the bones with a meat mallet or heavy knife before adding them to the pot. This releases flavor immediately and saves you from digging out cold, undercooked marrow later. (Yes, even if it looks messy at first.)
- SWEAT THE AROMATICS LOW AND SLOW: Don’t rush the onion, carrot, and celery—cook them in the pot with a splash of water for 10 minutes at a gentle simmer. This breaks down their fibers into the broth, giving it depth instead of just a veggie aftertaste. (I used to burn this step, and the soup never tasted right.)
- SKIP THE BOILING STAGE: Once everything’s in the pot, bring it to a hard simmer (small bubbles, not a rolling boil) and keep it there. Boiling toughens the meat and scatters marrow fat—low and steady is how you get tender beef and rich broth. (Your future self will notice the difference.)
- USE THE CHUCK ROAST’S FAT CAP: Leave the fat on the chuck roast—it renders into the pot and makes the broth velvety. If it’s too thick, skim later, but don’t trim it first. (I learned this after making a soup so lean it tasted like watered-down beef tea.)
Best sauces and condiments for this beef soup bone stew
Classic Horseradish Cream
This tangy, slightly spicy condiment elevates every spoonful of stew. Mix ½ cup sour cream with 2 tbsp prepared horseradish, 1 tbsp Dijon mustard, and 1 tsp lemon juice.
For extra richness, add 1 tbsp finely chopped chives. Serve chilled in small bowls—it cuts through the stew's richness while adding a refreshing kick. 🌶️
Garlic-Herb Butter
Melt ¼ cup unsalted butter with 3 minced garlic cloves, 1 tbsp chopped parsley, 1 tsp chopped thyme, and a pinch of salt. Drizzle over individual bowls just before serving to add a luxurious, aromatic finish.
The butter melts into the hot stew, creating a velvety coating on each bite.
Crispy Onion Topping
For texture contrast, caramelize 1 cup thinly sliced onions in 2 tbsp olive oil over low heat for 30 minutes until deep golden. Add 1 tbsp brown sugar in the last 5 minutes for extra depth. Sprinkle over stews to add crunch and sweetness that balances the savory broth.
Whipped Sour Cream
Lighten up the stew with a dollop of whipped sour cream—just ½ cup sour cream whipped with 1 tsp lemon zest and a pinch of salt. This cooling element works beautifully with the warm, hearty stew, especially if you've added extra richness. Serve on the side for customization.
Spicy Tomato Relish
Blend 1 cup diced tomatoes, 2 tbsp red wine vinegar, 1 tbsp red pepper flakes, 1 tsp sugar, and 1 tbsp chopped basil until chunky.
This bright, acidic relish cuts through the richness of the stew while adding a vibrant pop of color. Store in the fridge for up to 5 days.
Fresh Herb Garnish
Never underestimate the power of fresh herbs! Just before serving, sprinkle with chopped parsley and cilantro for brightness, or add thinly sliced chives for a delicate onion flavor. For a more robust finish, try microgreens or watercress—they add visual appeal and a peppery contrast to the rich stew. ✨
Nutrition facts
Frequently asked questions
Why do I need to brown the bones and meat first?
Browning creates a flavorful crust called the Maillard reaction, which adds deep, meaty notes to your stew. Skipping this step means missing out on that rich, caramelized foundation that makes homemade stew taste restaurant-quality. The browned bits also dissolve into the broth during cooking, enhancing every spoonful.
Can I use a pressure cooker instead of slow simmering?
For a pressure cooker, reduce the wine to ½ cup and cook on high pressure for 90 minutes after browning. The meat will be tender in half the time, though the broth won't develop the same gelatinous richness. For best results, finish with a 15-minute natural release before opening.
What if my stew tastes too salty?
If the broth is overly salty, dilute it by adding ½ cup water per quart of stew and simmer for 10 minutes to rebalance flavors. Avoid adding potatoes or other starches—they absorb salt but also dilute the rich umami. For prevention, taste the broth before adding the meat back in the final step.
How can I make this stew ahead of time?
This stew actually tastes better the next day! Store in an airtight container for up to 5 days refrigerated or 3 months frozen. Reheat gently on the stove with a splash of broth to restore texture. The flavors meld beautifully over time, making it perfect for meal prep.
What's the best way to use the leftover bones?
Crush the bones and simmer them with vinegar and water for 1 hour to extract every last bit of flavor. Strain and use this second-batch broth for future soups or braises—it's even more concentrated with gelatin. The bones can be reused 2-3 times this way before discarding.