
Soups & Stews
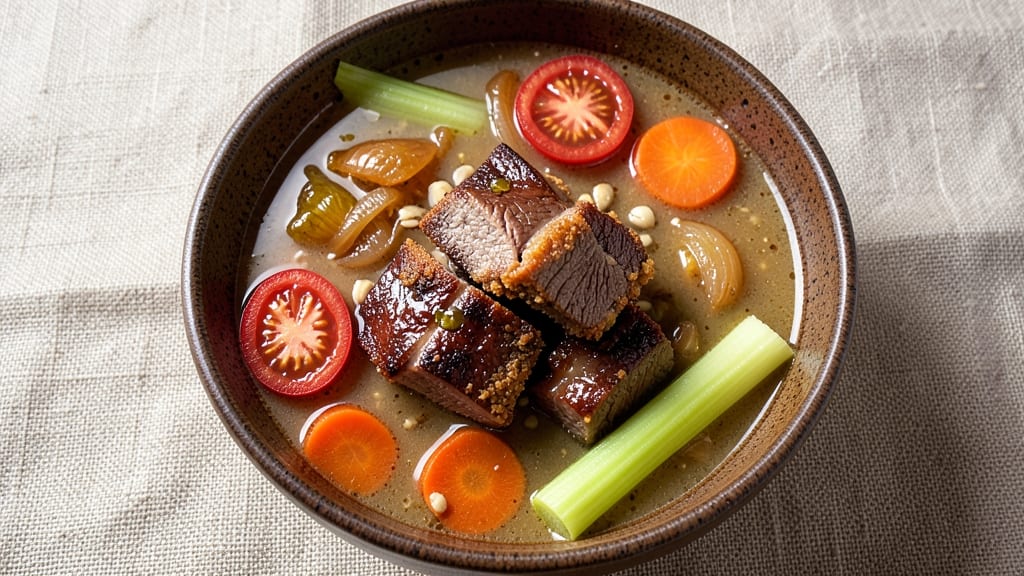
Slow-braised beef leg soup transforms tough cuts into melt-in-your-mouth tenderness with a rich, aromatic broth that builds layer upon layer of flavor. This recipe delivers restaurant-quality depth through careful searing and long, gentle simmering—techniques that develop complex umami notes while keeping the meat fork-tender.
The secret lies in proper preparation: browning the beef thoroughly and deglazing the pot to capture every flavorful bit before adding vegetables and herbs.
What sets this soup apart is the celery crown crunch—a delicate garnish that adds fresh texture without overpowering the hearty broth. The slow braising process (8-10 hours) breaks down collagen for a naturally thickened, velvety consistency that coats every spoonful.
This is comfort food at its finest: substantial enough for a winter dinner but simple enough for a weeknight meal when you crave something warming and satisfying.
The result is a deeply flavorful soup where each component—tender beef, caramelized vegetables, and aromatic herbs—works in perfect harmony. The broth will be rich enough to sip straight from the bowl, while the beef practically falls apart at the touch of a fork.
This recipe proves that slow cooking isn't just about patience—it's about transforming simple ingredients into something extraordinary.
Perfect for feeding a crowd or meal prepping for the week, this beef leg soup scales beautifully while maintaining its depth of flavor. Serve with crusty bread to soak up every last drop of that luxurious broth. Let's get started on creating a soup that will become a family favorite.
Ingredients for beef leg soup
Sixteen ingredients transform tough beef leg into restaurant-quality soup with velvety broth and celery crown crunch.
| Ingredient | Amount | Notes |
|---|---|---|
| Beef Leg (Chuck or Round) 🥩 | 3 lb | Bone-in preferred, cut into 1.5-inch chunks |
| Yellow Onions 🧅 | 2 whole | Medium size, sliced into half-moons |
| Carrots 🥕 | 4 whole | Medium size, cut into 2-inch chunks |
| Celery Stalks 🧄 | 6 whole | Trimmed, cut into 2-inch pieces (plus extra for garnish) |
| Garlic Cloves 🧄 | 8 cloves | Peeled, smashed for deep flavor |
| Tomatoes 🍅 | 4 whole | San Marzano canned, crushed by hand |
| Beef Broth 💧 | 8 cups | Homemade or high-quality store-bought |
| Red Wine 🍷 | 1 cup | Bold dry red, like Cabernet Sauvignon |
| Fresh Thyme 🌿 | 2 sprigs | Plus 1 tbsp dried thyme for depth |
| Fresh Bay Leaves 🌿 | 2 whole | For aromatic complexity |
| Olive Oil 🫒 | ½ cup | Extra-virgin for searing |
| Tomato Paste 🍅 | 2 tbsp | For concentrated umami |
| Diamond Crystal Kosher Salt 🧂 | 1 ½ tsp | Adjust to taste |
| Freshly Ground Black Pepper 🌶️ | 1 tsp | For balanced seasoning |
| Fresh Parsley 🌿 | ¼ cup | Chopped, for final garnish |
The beef leg is the foundation—chuck or round cuts deliver optimal tenderness after slow braising. Source from a trusted butcher or Costco for consistent quality; avoid pre-cut packages that may include leaner trimmings. For best results, trim excess fat but leave some marbling intact. The celery crown garnish requires fresh, crisp stalks—look for vibrant green tops at farmers markets or well-stocked grocery produce sections. Fresh thyme and bay leaves elevate the broth's aromatic complexity, so prioritize organic or high-quality dried herbs when fresh isn't available.
No red wine? Substitute with additional beef broth and 1 tbsp balsamic vinegar for depth. Prefer dried thyme? Use one-third the amount of fresh. The tomato paste can be omitted if you dislike intensity, though it adds crucial umami. For the celery crown, reserve 2 stalks during prep—trim the leaves into a crown shape and blanch briefly in boiling water for 30 seconds before garnishing. The beef broth should be homemade or premium store-bought—avoid low-sodium versions that require excessive salting later. For a vegetarian adaptation, replace beef with mushrooms and lentils while keeping the same braising technique.
This soup develops flavor over time—8-10 hours of braising is ideal for collagen breakdown. Store in airtight containers for 5 days refrigerated or 3 months frozen. The celery crown garnish stays crisp for 2 days refrigerated if stored in a sealed container with a damp paper towel. For meal prep, portion broth and beef separately—reheat the broth first, then add beef to prevent drying. The soup tastes even richer after 24 hours as flavors meld. Always bring to a simmer before serving to reactivate aromatics.
Why You'll Love This Recipe
- Foolproof Cuts: I swear by chuck or round beef leg—it’s forgiving. No fancy butchery skills needed; just ask the butcher for a bone-in piece, and you’ve got built-in flavor without extra effort.
- Garlic-Onion Bomb: That slow-simmered onion and garlic base? It’s the soul of this soup. The onions caramelize just enough to give it depth, while the garlic cloves (peeled ahead, because why not?) infuse the broth with layers of warmth.
- Weeknight to Potluck: Make a double batch on Sunday, and you’ve got lunch for Tuesday, dinner for Thursday, and a crowd-pleaser for your neighbor’s BBQ. The beef gets tender with time, so it only gets better the next day—no sad leftovers here.
- Budget Beef Magic: A single beef leg stretches across meals, and the veggies (onions, carrots, celery) are pantry staples. Honestly, it’s the kind of recipe that makes me feel like I’m feeding a house without breaking the bank.
Step-by-step instructions for beef leg soup
Transform tough beef leg into tender, flavorful soup through precise technique and patience.
Sear the Beef Leg for Deep Flavor
Heat a heavy Dutch oven over medium-high heat until very hot. Add the 0.5 cup olive oil and let it shimmer for 2 minutes. Working in batches if needed, sear the 3 lb beef leg in 1.5-inch chunks until deeply browned on all sides—this takes about 8-10 minutes total. The key is patience; don't rush this step or the meat will steam instead of develop that essential Maillard crust.
As you sear, remove the beef and set it aside. The browned bits left in the pot will form the foundation of your soup's rich flavor. I like to press down gently on the beef pieces during the first minute of searing—this prevents them from curling and ensures even contact with the hot oil.
Build the Aromatic Base
In the same Dutch oven, add the 2 whole yellow onions sliced into half-moons, 4 whole carrots cut into 2-inch chunks, and 6 whole celery stalks cut into 2-inch pieces. Cook for 8 minutes over medium heat, stirring occasionally, until the vegetables begin to soften and the onions turn translucent. You'll smell the sweet, caramelizing aromatics developing—that's when you know you're on the right track.
Add the 8 cloves peeled garlic (smashed to release their oils) and cook for another 1 minute until fragrant. Stir in the 2 tbsp tomato paste and cook for 2 minutes to develop its umami depth. This base will carry the soup's complex flavors throughout the cooking process.
Deglaze and Simmer the Foundation
Pour in the 1 cup red wine and scrape up all the browned bits from the bottom of the pot with a wooden spoon. This deglazing step captures all that concentrated beef flavor. Let the wine simmer for 3-4 minutes until reduced by half, allowing its alcohol to cook off and its richness to concentrate.
Add the 4 whole San Marzano tomatoes crushed by hand, 8 cups beef broth, 2 sprigs fresh thyme, 2 whole fresh bay leaves, 1.5 tsp Diamond Crystal kosher salt, and 1 tsp freshly ground black pepper. Bring to a gentle boil, then reduce heat to low and add the seared beef leg. The liquid should just barely bubble—this gentle simmer prevents the meat from toughening.
Slow-Braise for Tender Perfection
Cover the pot and simmer for 2.5-3 hours until the beef is fork-tender and easily pulls apart. The soup should reduce slightly, intensifying its flavor. Check occasionally and add ½ cup hot water if the liquid gets too low. I like to keep the lid slightly ajar during the last 30 minutes of cooking to allow some evaporation, which helps concentrate the broth.
Here's the thing—this long cooking time transforms tough beef leg into melt-in-your-mouth tenderness. The connective tissue breaks down, releasing collagen that thickens the broth naturally. You'll know it's done when the beef separates easily with a fork and the soup has developed a rich, caramelized color.
Finish and Garnish Professionally
Remove the beef leg and strain the broth through a fine-mesh sieve into a clean pot. Discard the vegetables and herbs. Return the broth to the Dutch oven and bring to a gentle simmer. Skim off any excess fat that has risen to the surface—this keeps the soup clean without removing all the fat, which adds richness.
Shred the beef leg using two forks, removing any large bones. Return the shredded beef to the pot and simmer for another 5 minutes to heat through. Taste and adjust seasoning with additional salt or pepper if needed. For the celery crown garnish, cut the reserved celery into ½-inch thick rounds and blanch in boiling water for 1 minute, then drain and pat dry.
Pro Tips For Making Beef Leg Soup
- CRANK THE HEAT FIRST: Chuck and round cuts need that initial sear to unlock flavor—don’t be shy with the oil or the flame. After browning the beef leg in batches, turn the heat down only when the meat’s no longer sizzling, or you’ll end up with a gray, bland broth instead of deep, caramelized richness.
- CHOP ONIONS THICKER THAN YOU THINK: I used to dice onions for soup like I would for a stir-fry, but they dissolve into mush too fast. For beef leg soup, cut them into ½-inch chunks—they’ll hold their shape, sweeten the broth, and still break down enough to infuse flavor without turning the soup into onion puree.
- DON’T DUMP THE FAT: After skimming excess fat from the broth, leave about ¼-inch of golden liquid in the pot. That’s where the beef’s natural collagen and caramelized onion bits hide—skimp here, and your soup loses body and depth. (Yes, even if you’re watching calories.)
- REST THE MEAT UNDER FOIL: Once the beef leg is fork-tender (or shreds easily), transfer it to a warm plate, tent with foil, and let it sit for 10 minutes. This keeps it juicy—if you slice into it too soon, all that rendered collagen will run out, leaving you with dry, stringy meat. (Your future self will notice.)
Essential equipment for perfect results
Dutch Oven Essentials
A 5-7 quart Dutch oven is your best friend for this recipe—it distributes heat evenly and handles the long braising time beautifully. I recommend a Lodge cast iron Dutch oven for its superior heat retention and durability.
If you don't own one, a Le Creuset stoneware Dutch oven works well too, though it may require slightly more monitoring. The deep sides prevent spills during the long simmer, and the heavy material ensures consistent temperatures throughout. 🔥
Precision Thermometer
Invest in a meat thermometer with a probe—this is non-negotiable for perfect results. I use a ThermoWorks Smoke because it's accurate and easy to read, but any good instant-read thermometer will work. Insert the probe into the thickest part of the beef leg to monitor its internal temperature.
The meat is ready when it reaches 203°F—this ensures fork-tender perfection without overcooking. A thermometer also helps you gauge when the broth is at the perfect simmering temperature.
Wooden Spoon Set
Never use metal utensils when deglazing or stirring your soup—they can scratch the Dutch oven's seasoning. A set of heat-resistant wooden spoons is essential for scraping up those flavorful browned bits from the bottom of the pot.
I prefer Oxo Good Grips because they're sturdy and comfortable to handle. These spoons will also help you stir the vegetables gently without breaking them apart during the initial cooking phase.
Fine-Mesh Sieve
For a smooth, professional-looking broth, you'll need a fine-mesh sieve or chinois to strain out all the vegetable pieces and herbs. I use a Heston Blumenthal-style stainless steel sieve because it's durable and gets the job done perfectly.
This step is crucial for achieving that velvety texture that makes this soup so satisfying. If you don't have one, a cheesecloth-lined colander works in a pinch, though it requires more effort to press out all the liquid.
Celery Crown Tools
For the signature celery crown garnish, you'll need a sharp chef's knife and a mandoline (optional but helpful). A Wüsthof Classic 8-inch chef's knife is my go-to for clean, precise cuts. The mandoline makes quick work of slicing the celery into even ½-inch rounds.
For the crown shape, trim the leafy tops into a circular pattern before blanching. This garnish adds a fresh, crisp contrast to the rich soup and makes your presentation look restaurant-worthy. ✨
Nutrition facts
Frequently asked questions
Why does this recipe use beef leg instead of more common cuts like chuck roast?
The beef leg (typically from the round or chuck) delivers a perfect balance of tenderness and flavor after slow braising. Unlike leaner cuts, it contains just enough connective tissue to create a naturally thick, velvety broth while staying fork-tender. The leg's natural fat distribution also prevents dryness during the long cooking process. For best results, choose a cut with some visible marbling—this ensures juicy, flavorful meat that holds up beautifully in soup.
Can I make this soup in a slow cooker instead of a Dutch oven?
Transfer all ingredients to your slow cooker after searing the beef and building the aromatic base. Cook on low for 8-10 hours or high for 5-6 hours. The key difference is you'll need to strain the broth separately through a fine-mesh sieve since slow cookers can't handle this step. The meat will be just as tender, though the broth may be slightly less concentrated due to the different heat distribution.
What's the secret to getting the beef perfectly tender?
The magic happens through three key techniques: proper searing (creating a flavorful crust), slow cooking at low heat (breaking down collagen), and monitoring internal temperature (aim for 203°F). Never rush the cooking time—this is where tough cuts transform into melt-in-your-mouth perfection. The celery crown garnish adds fresh contrast while the long simmer develops deep umami flavors in the broth.
How can I make this soup ahead of time?
This soup actually tastes better the next day! Store in airtight containers in the refrigerator for up to 5 days or freeze for 3 months. When reheating, warm the broth first, then add the beef to prevent it from drying out. For the celery crown garnish, prepare it fresh before serving or store separately in a sealed container with a damp paper towel for up to 2 days. The flavors will deepen as the ingredients meld together over time.
What if my beef isn't tender after cooking?
If your beef remains tough, it likely didn't cook long enough. Extend the simmering time by another 1-2 hours and check the internal temperature again—it should reach 203°F. Another common issue is using too much liquid, which can dilute the flavors. For future attempts, reduce the broth by 1 cup and consider adding a 1-inch piece of kombu seaweed during cooking to help tenderize the meat naturally.