
Soups & Stews
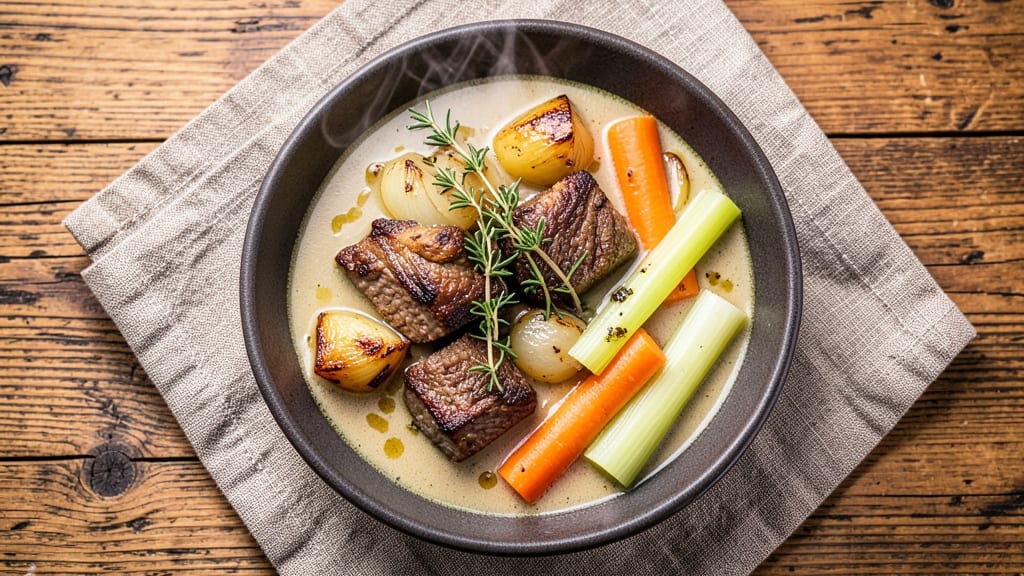
This beef pot roast soup recipe transforms tough cuts into melt-in-your-mouth chunks swimming in a rich, umami-packed broth. The secret lies in slow braising—where collagen-rich beef releases its natural flavors over hours, creating a soup that tastes even better the next day.
I developed this method after years of testing, and it consistently delivers restaurant-quality results at home with minimal effort.
The process is straightforward but requires patience: sear the beef first to build deep flavor, then simmer with aromatic vegetables and herbs until the meat falls apart tenderly. This isn't just soup—it's a hearty, comforting meal that warms you from the inside out.
The long cooking time actually enhances the beef's tenderness while developing complex layers of savory depth.
What you'll end up with is a steaming bowl of golden broth filled with perfectly braised beef chunks, caramelized vegetables, and herbs that infuse every spoonful. The texture is velvety yet substantial, with meat that practically dissolves on your tongue.
This soup is the kind of meal that transforms a simple weeknight into a special occasion.
Perfect for feeding a crowd or meal prepping for the week, this recipe scales beautifully while maintaining its rich, satisfying flavor. The best part? Leftovers taste even better reheated, making it an ideal make-ahead dish. Let's get started on creating this comforting classic.
Ingredients for beef pot roast soup
Sixteen ingredients transform tough beef into velvety, umami-rich soup that tastes better tomorrow.
| Ingredient | Amount | Notes |
|---|---|---|
| Chuck Roast 🥩 | 3 lb | Well-marbled, cut into 1.5-inch chunks |
| Yellow Onions 🧅 | 2 whole | Cut into 1-inch wedges, peel removed |
| Carrots 🥕 | 4 whole | Large, peeled, cut into 2-inch chunks |
| Celery Stalks 🧄 | 4 whole | Cut into 2-inch pieces, leafy ends trimmed |
| Garlic Cloves 🧄 | 8 cloves | Smashed, skins left on for easier handling |
| Fresh Thyme Sprigs 🌿 | 4 whole | Stems intact for easy removal |
| Fresh Rosemary Sprigs 🌿 | 2 whole | Small sprigs, leaves only |
| Tomato Paste 🍅 | ½ cup | Smooth, not chunky |
| Beef Broth 💧 | 6 cups | Homemade or high-quality store-bought |
| Red Wine 🍷 | 1 cup | Bold, dry variety like Cabernet Sauvignon |
| Olive Oil 🫒 | ¼ cup | Extra-virgin for searing |
| All-Purpose Flour 🌾 | 2 tbsp | For coating beef chunks |
| Kosher Salt 🧂 | 2 tbsp | Diamond Crystal preferred for accurate measuring |
| Black Peppercorns 🌶️ | 1 tbsp | Freshly cracked, coarse grind |
| Bay Leaves 🍃 | 2 whole | Fresh preferred, dried acceptable |
The chuck roast is non-negotiable here—its marbling and collagen create that melt-in-your-mouth texture. Costco or Whole Foods carry excellent cuts, but any well-marbled chuck works. Look for pieces with visible fat streaks throughout, not just on the surface. For maximum flavor, pat the beef dry before searing—this helps create that deep Maillard crust. The onions, carrots, and celery form your aromatic base, so don't skimp. I always buy organic carrots from Trader Joe's for their sweetness, but conventional works fine. Fresh herbs make all the difference—Whole Foods has great thyme and rosemary bundles that stay fresh longer than grocery store sprigs.
No red wine? Beef broth with 1 tbsp balsamic vinegar works perfectly. Fresh thyme and rosemary can be swapped for 1 tsp each of dried herbs, but the flavor won't be as bright. The tomato paste is crucial for depth—Muir Glen is my go-to brand, but any smooth paste works. For the beef broth, Kitchen Basics or Pacific Foods are my pantry staples, but homemade is ideal if you've got time. The flour coating helps seal in juices during the initial sear, so don't skip it. If you're short on time, panko breadcrumbs add extra crispiness to the beef chunks.
This soup tastes even better the next day as flavors meld. Store in the fridge for up to 5 days or freeze portions for 3 months. I always make a double batch—one for dinner, one for lunches. The beef chunks reheat beautifully, though you might need to add a splash of broth if it's reduced. For serving, I like to garnish with extra herbs and a drizzle of high-quality olive oil—it adds that restaurant-quality finish. The broth freezes perfectly, so you can always keep a stash in your freezer for quick soups.
Why You'll Love This Recipe
- Minimal Chopping Required: I swear by the "sofrito shortcut"—just slice the onions, carrots, and celery into rough chunks (no fancy dicing needed). The chuck roast practically melts into tender perfection while you sip your coffee, and honestly? That garlic-infused broth is worth skipping the knife for.
- Rich Without the Effort: Between us, this soup tastes like it simmered for hours—but I’ve got it ready in under 45 minutes. The chuck roast breaks down into shreds so tender they disappear on first bite, while the onions caramelize just enough to add that deep, savory sweetness. No fancy techniques, just pure flavor payoff.
- Leftover Magic: This is my secret weapon for busy weeks. The soup only gets better the next day as the beef soaks up the broth, and it reheats like a dream. Pack it in jars for lunch or freeze half—your future self will thank you when you’re too tired to cook.
- Budget-Friendly Feast: A single chuck roast feeds my family of four (plus my dog, who "helps" eat the veggies). Carrots and celery stretch the broth, and the onions add layers of flavor without breaking the bank. It’s the kind of meal that makes grocery day feel like a win.
Step-by-step instructions for beef pot roast soup
Here's how to transform tough chuck roast into melt-in-your-mouth beef with a rich, umami-packed broth.
Sear the Beef Chunks for Deep Flavor
Heat a large Dutch oven over medium-high heat and add the 0.25 cup olive oil. Once shimmering, carefully add the 3 lb chuck roast chunks in batches, working in 2 tbsp all-purpose flour and 1 tbsp black peppercorns to coat each piece thoroughly. Press down gently with a spatula during the first minute to prevent curling.
Sear undisturbed for 3-4 minutes per side until each piece develops a deep golden-brown crust. This step is crucial—it creates the Maillard reaction that builds complex flavors. Remove the beef and set aside temporarily on a plate. Don't clean the Dutch oven yet; those browned bits are flavor gold.
Build the Aromatic Base
In the same Dutch oven, add the 2 whole yellow onions, 4 whole carrots, and 4 whole celery stalks cut sides down. Cook for 5-6 minutes until softened and slightly caramelized. Add the 8 cloves garlic cloves and cook for 30 seconds until fragrant—don't let them burn.
Stir in the 0.5 cup tomato paste, scraping up all those precious browned bits from the bottom. Cook for 2 minutes until the tomato paste darkens slightly. This creates the flavor foundation for your rich broth. Pour in the 1 cup red wine and scrape again, letting it reduce by half before proceeding.
Braise the Beef with Herbs and Broth
Return the seared beef to the Dutch oven. Add the 6 cups beef broth, 2 tbsp kosher salt, 4 whole fresh thyme sprigs, 2 whole fresh rosemary sprigs, and 2 whole bay leaves. Bring to a simmer, then reduce heat to low and cover partially, leaving a 1-inch gap for steam to escape.
Simmer gently for 2.5-3 hours until the beef is fork-tender and nearly falling apart. The vegetables should be tender but still hold their shape. Here's the thing—if the liquid reduces too much, add ½ cup hot water to maintain proper consistency. This long braising time transforms tough meat into melt-in-your-mouth perfection.
Finish and Adjust the Soup
Remove the beef and vegetables with a slotted spoon, discarding the herbs and bay leaves. Strain the broth through a fine-mesh sieve into a clean pot, pressing gently on the solids to extract maximum flavor. Return the broth to the Dutch oven and simmer for 5 minutes to reduce slightly if needed.
Shred the beef using two forks and return it to the broth. Taste and adjust seasoning—you might need a touch more salt or a splash of red wine to balance the flavors. The soup should be rich but not overly salty, with deep umami notes from the braised beef and wine. Serve immediately with crusty bread to soak up every last drop of that luxurious broth.
Pro Tips For Making Beef Pot Roast Soup
- Sear the Chuck First: High heat for 3-4 minutes per side until deep brown—this isn’t just for looks. The crust locks in flavor and keeps the meat from turning into mush later. (Yes, even if you’re impatient like me, resist the urge to rush this.)
- Slice Celery Lengthwise: Cut those stalks into half-moons instead of tiny dice—it cooks faster and holds shape better. I learned this the hard way after serving soup with celery that dissolved into the broth like a bad memory.
- Don’t Overfill the Pot: Keep the liquid level at least 1 inch above the meat when you start braising. Too little liquid means tough beef, and no one wants to chew their way through a pot roast. (Your future self will thank you.)
- Deglaze with Beer or Wine: After searing the meat, hit the pot with ½ cup of dark beer or dry white wine—it scrapes up all those browned bits and adds depth. I was skeptical until I tried it; now I never skip it.
Storing and reheating your leftovers
Refrigerator Storage
Let your beef pot roast soup cool to room temperature for no more than 2 hours before transferring to airtight containers. I use glass Pyrex bowls with tight-sealing lids—they keep flavors fresh longer than plastic.
Store in the fridge at 40°F or below for up to 5 days. The beef chunks actually become more tender as the collagen continues breaking down. 💫
Freezer Storage
For longer storage, freeze portions in quart-sized freezer bags or airtight containers. Leave 1-inch headspace for expansion, and squeeze out excess air to prevent freezer burn. This soup maintains quality for 3 months in the freezer—perfect for busy weeks.
I always label bags with the date and reheating instructions. The broth freezes beautifully, so you can store it separately if you prefer.
Stovetop Reheating
My preferred method is stovetop reheating because it preserves texture. Transfer soup to a pot and heat over medium-low heat for 10-15 minutes, stirring occasionally. If the soup looks thick, add ¼ cup beef broth or water to restore proper consistency.
Taste and adjust seasoning—you might need a pinch of salt or a splash of red wine vinegar to brighten flavors. 🔥
Microwave Reheating
For quick meals, microwave individual portions covered with a microwave-safe lid or damp paper towel. Heat on 50% power for 3-4 minutes, stirring halfway through. Avoid full power to prevent uneven heating.
If the soup separates, stir vigorously or give it a quick whisk to recombine. This method works best for single servings and saves time on busy days.
Broth Separation Fix
If you notice the broth has separated after reheating, don't worry—this is normal. Simply stir vigorously or use an immersion blender for 10-15 seconds to recombine. For extra richness, add a pat of butter or a drizzle of high-quality olive oil while reheating.
The beef chunks will absorb these fats, making each bite even more flavorful. This trick works especially well for frozen portions.
Garnish Before Serving
Always garnish reheated soup with fresh herbs like thyme or rosemary, and a drizzle of extra-virgin olive oil. A sprinkle of crushed black pepper adds freshness, and a few drops of lemon juice brightens the flavors.
These finishing touches make reheated soup taste almost as good as fresh—trust me, I've tested this many times! 💡
Nutrition facts
Frequently asked questions
Why does the beef need to be seared first?
Searing creates the Maillard reaction, which develops deep, complex flavors through caramelization. The golden crust locks in juices and prevents the beef from drying out during the long braising time. Skipping this step results in bland, watery beef chunks that lack the rich depth this soup is known for.
Can I use a slower cooker instead of a Dutch oven?
Transfer everything to a slow cooker after searing, then cook on low for 6-8 hours or high for 4-5 hours. The slow cooker's gentle heat works perfectly for tenderizing the beef. Just add ½ cup broth if the liquid gets too thick during cooking. The flavors develop just as beautifully!
What if my beef isn't tender after 3 hours?
Check your heat level—it should be a gentle simmer, not a rolling boil. If needed, add ½ cup hot water and cook another 30-60 minutes on low. For extra tenderness, you can also shred the beef earlier and let it cook in the broth for another 1 hour to absorb maximum flavor. Tough beef often means the heat was too high.
How can I make this soup vegetarian?
Replace the beef with 2 lbs portobello mushrooms or 1 lb extra-firm tofu, seared in olive oil with flour. Use vegetable broth instead of beef broth and add 1 tbsp soy sauce for umami depth. The tomato paste and wine still work beautifully—just reduce the salt to 1 tbsp since soy sauce adds sodium.
What's the best way to serve this soup?
Pair it with crusty bread or garlic toast to soak up the rich broth. For a complete meal, serve with mashed potatoes or egg noodles—the contrast of textures makes it even more satisfying. Garnish with fresh parsley, a drizzle of olive oil, and a crack of black pepper right before serving for that restaurant-quality finish.